

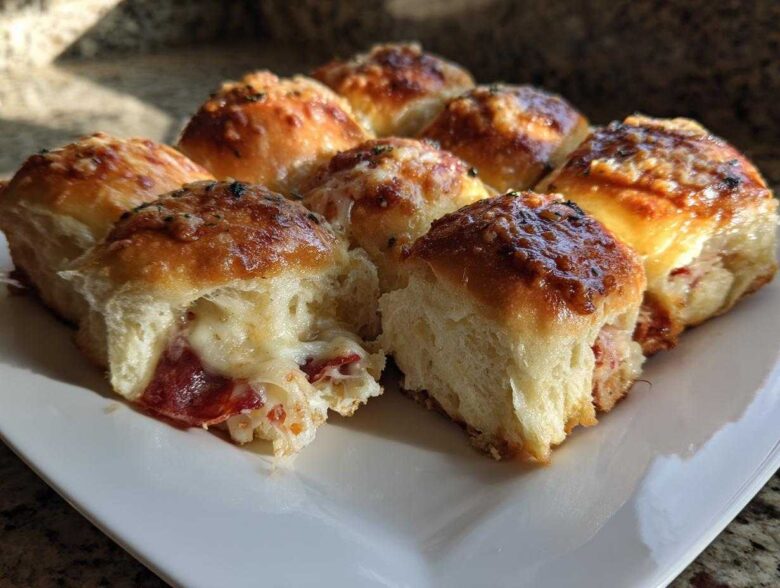
If you’re anything like me, when Game Day rolls around or you suddenly realize you need a party appetizer FAST, your brain immediately goes to the easiest, cheesiest thing possible. Forget complicated doughs! My absolute favorite, can’t-be-beat secret weapon for feeding a crowd is these incredible pizza sliders. Trust me when I say these pull-apart beauties made with sweet Hawaiian rolls changed my hosting game forever.
I used to stress myself sick trying to make individual snacks, but assembling this entire batch takes less than 15 minutes. You layer everything right in the pan, cover it, and let the oven do the heavy lifting. Suddenly, hosting for the Super Bowl or even just a Tuesday night pizza fix becomes totally stress-free. They come out gooey, savory, and smelling like the best pizzeria in town!
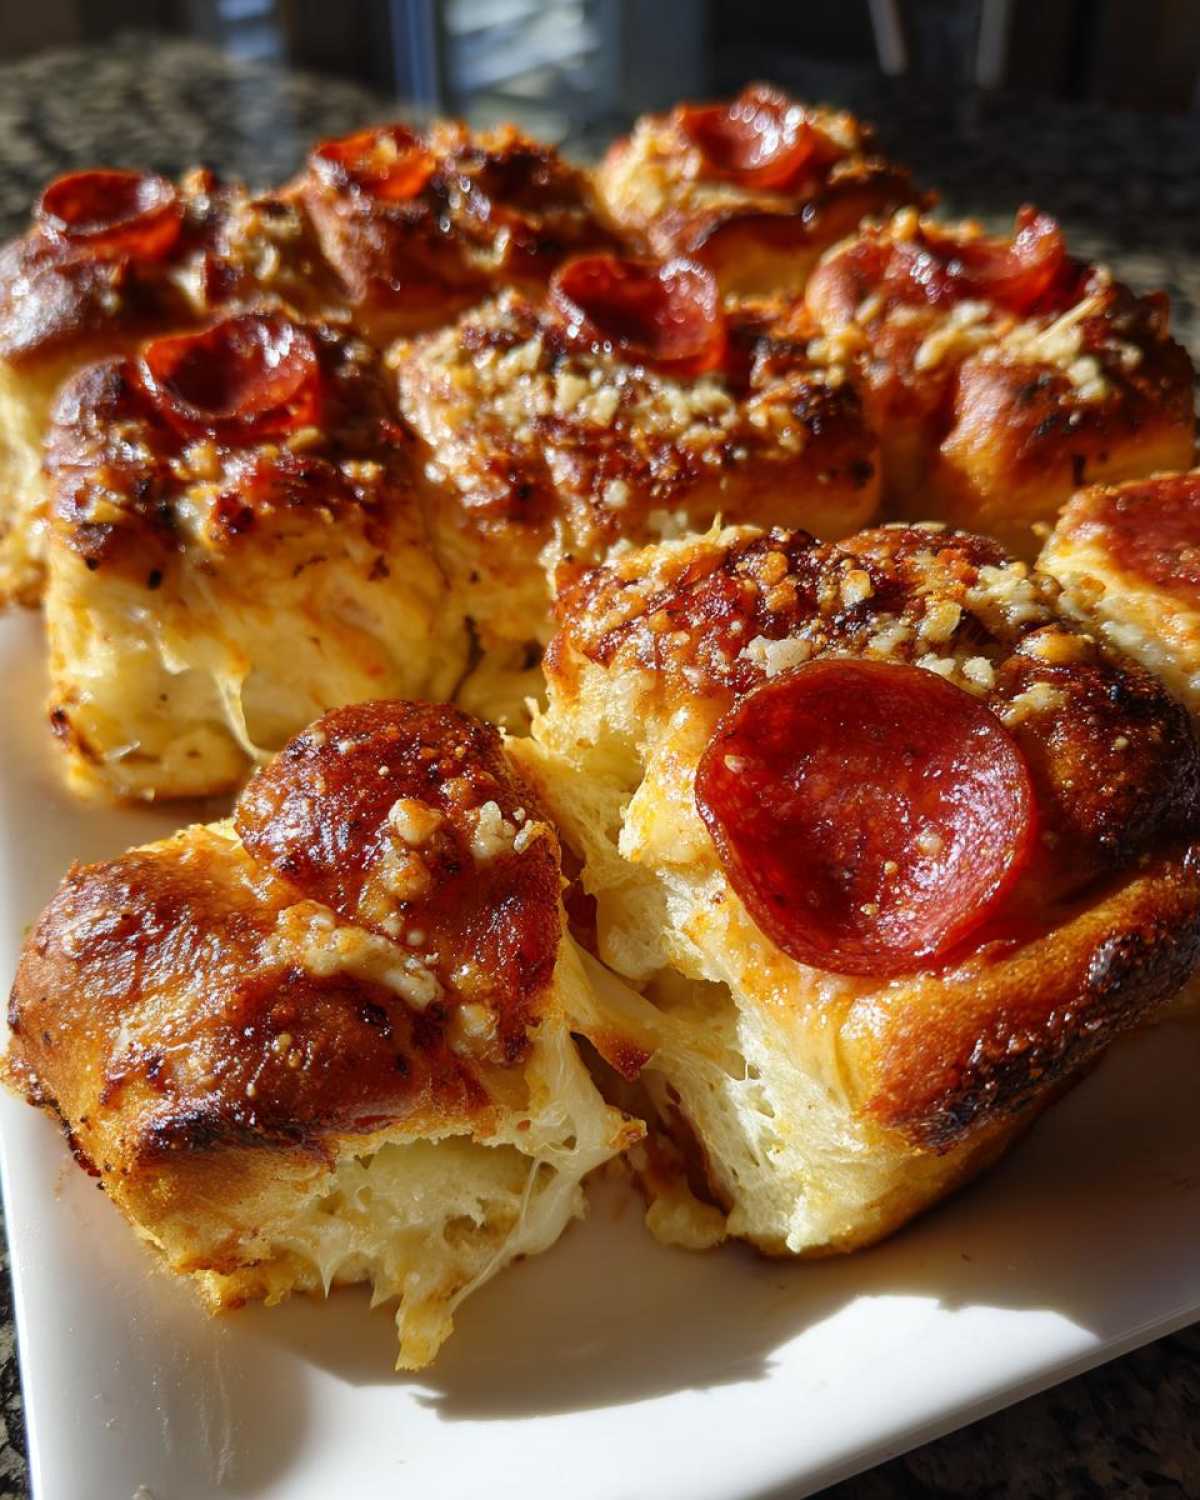
Before we dive into the magic of the garlic butter topping, you should absolutely check out my recipe for bacon-wrapped jalapeno poppers if you need another guaranteed crowd-pleaser to serve alongside these!
Why You Will Love These Easy Pizza Sliders Recipe
I’ve made hundreds of appetizers over the years, but nothing gets devoured faster than these simple sandwiches. Honestly, every time I pull them out, I’m shocked they looked so humble just minutes before! They manage to be incredibly tasty while requiring almost zero effort.
Here’s why these Hawaiian roll pizza sliders are about to become your go-to party food:
- They are genuinely lightning fast! Prep time is under 15 minutes, so you aren’t stuck baking tiny snacks while the game is starting.
- That sweet and savory combo hits just right. The sugar from the rolls perfectly cuts through the saltiness of the pepperoni and cheese.
- Everything stays connected! That’s the magic of this pull apart pizza sliders style—no searching for dropped pepperoni under the couch cushions.
- Maximum meltiness guaranteed. We layer up the mozzarella so you get that perfect cheese pull every single time you take one.
- They are incredibly versatile. Toss in some olives or sautéed onions if you’re feeling fancy, but they are fantastic just as written.
- They satisfy everyone! These are kid friendly pizza bites wrapped up in a grown-up, savory package.
If you’re looking for another dip that pairs perfectly with these bites, you have to try my cheesy spinach artichoke dip—it makes the setup so easy!
Gathering Ingredients for Your Hawaiian Roll Pizza Sliders
The absolute star of this whole operation is the bread, hands down. You absolutely must grab the sweet Hawaiian rolls here. I know some folks try to use plain slider buns, but trust me, having that slight sweetness in every savory bite is what makes this cheesy slider recipe sing! Don’t skimp on the cheese, either. We are going heavy on the mozzarella because we want maximum melty magic hitting the pan.
For the rest of the fixings, you’ll need a good, thick pizza sauce—I prefer one that isn’t too watery, or we’ll end up with soup on the bottom of the pan! Then, generously layer on the pepperoni, thinly sliced so it crisps up just right around the edges.
And don’t forget the secret kicker! That garlicky, herby butter brushed over the top right before baking is non-negotiable. It dries out the tops slightly and makes them golden brown instead of just steaming inside the foil. If you’re looking for another amazing dip to serve right alongside these sliders, you have to check out my ultimate pizza dip!
Ingredient Notes and Substitutions for Amazing Pizza Sliders
If you can’t find Hawaiian rolls, brioche rolls are the next best thing, but they are sweeter, so maybe cut back on the sugar in the butter topping! For the cheese, if you want extra flavor, mix some provolone in with your mozzarella. When it comes to the pepperoni, you can totally swap this out for sliced ham for a different vibe, or skip it entirely for a veggie version. If your pizza sauce seems thin, just stir in a teaspoon of cornstarch before spreading it on the bottom layer of rolls. That little trick helps keep everything firmly tucked inside the bread!
Step-by-Step Instructions for Perfect Pull Apart Pizza Sliders
This is where the assembly magic happens! It moves so fast you might think you missed a step, but I promise, this is the easy part. First things first: preheat your oven to 350 degrees Fahrenheit and get that 9×13 inch baking dish slicked up with a little non-stick spray or whatever grease you prefer. You don’t want these beauties sticking! If you have leftovers or plan ahead, you can check out my pepperoni pizza pinwheels for another fun way to use up those ingredients later.
Now, take your whole package of Hawaiian rolls and slice them horizontally one time, like opening a giant book. Keep them attached so they don’t scatter everywhere on you! Place the whole bottom half right into your prepared dish. This is the foundation for your pepperoni sliders recipe.
Spread your pizza sauce evenly across that bottom layer. Don’t drown it, but make sure every roll piece gets some love. Next, lay down that pound of pepperoni—I like to overlap it a tiny bit—and then evenly shower everything with your shredded mozzarella. Top it with the other half of the rolls. You should have a perfect, fluffy-looking sandwich block ready for flavor!
Preparing the Garlic Butter Sliders Topping
While your oven is heating up, you need to whip up the flavor bomb for the top layer. In a small bowl, melt your butter. Toss in those two cloves of minced garlic and the Italian seasoning. Whisk it together until it smells incredible! Then, take a pastry brush—or even the back of a spoon if you’re in a rush—and brush this amazing liquid evenly over the entire top surface of the rolls. Don’t leave any dry spots exposed! Finally, sprinkle that grated Parmesan cheese right on top for a little salty kick when it bakes.
Baking Times and Achieving Melty Mozzarella Sliders
This is a two-stage baking process, which is crucial! First, cover the dish tightly with aluminum foil. This traps the steam and heats everything through perfectly, getting the cheese nice and melty without burning the tops. Bake it covered for 15 minutes. Then, ditch the foil! Take it out and bake uncovered for another 5 to 10 minutes. You are looking for the cheese to be bubbly and totally melted, and the top of those rolls should be just starting to crisp to a gorgeous golden brown. Let them rest for five minutes before you pull them apart; that keeps the cheese inside!
If you want another savory, buttery dish to serve alongside these, you should review my recipe for garlic butter steak bites with potatoes!
Tips for Success Making the Best Pizza Sliders
Getting these melty mozzarella sliders perfect every time is entirely down to a couple of tiny tricks. Remember how I mentioned those soggy bottoms? Seriously, don’t skip that pre-toast! If you’re worried about moisture, slice the rolls and pop just the bottom half in the oven for about three minutes before you start assembling. It dries out the bread just enough so the sauce doesn’t seep through during that initial covered bake.
Also, when you’re layering, try to distribute the pepperoni pretty evenly edge-to-edge. If you pile all the toppings in the middle, the rolls on the outside corners won’t get that great cheesy coverage. Layering thoughtfully ensures every single person gets a perfect, flavorful bite.
If you need inspiration for another cheesy appetizer that travels well, you will love my tutorial on making the best homemade mozzarella sticks!
Making Pizza Sliders Ahead: Make-Ahead and Storage Guide
Listen, planning for parties, especially big ones like the Super Bowl, means you want to do as much as humanly possible ahead of time, right? The great news is that these Hawaiian roll pizza sliders are wonderful for making ahead! You can assemble the entire thing—sauce, pepperoni, cheese, the works—wrap it up super tight in that foil, and stick it in the fridge. I usually aim to get them assembled about four hours before I plan to bake them.
Now, don’t just pop them straight from the fridge into the oven! You have to adjust the time slightly. Since the dish is cold, you’ll need an extra 5 to 10 minutes covered time in the initial 15 minutes of baking. Just make sure that cheese gets fully heated through before you uncover them for the final golden crisp. It works like a charm, and you can focus on grabbing your favorite make-ahead casserole instead of scrambling right before guests arrive.
What about leftovers? Oh, there are usually a few hiding in the pan! Microwaving them makes them soft, and nobody wants a steamed sandwich. If you have any left, pop those individual sliders onto a baking sheet and reheat them at about 325 degrees for about 8 minutes until that cheese is gooey again. An air fryer works wonders for leftovers if you have one!
Serving Suggestions for Your Game Day Appetizers Pizza Sliders
These game day appetizers are pretty robust on their own, but presentation matters when you’re feeding a crowd! I love serving these right out of the baking dish so people can just reach in and pull one off. If you need dips to go alongside them, you can’t go wrong with my creamy buffalo chicken dip—the spice is a great contrast to the sweet rolls.
For something totally different but just as easy, my seven-layer taco dip is always a winner. As for drinks? Keep it simple! Cold sodas, sparkling water, or a light, crisp beer pair perfectly with all that savory, garlicky goodness. Setting these out means half the work for your party menu is done!
Frequently Asked Questions About Pizza Sliders
I get asked about this easy pizza sliders recipe all the time because everyone wants to make sure they get that perfect melt! Since these are so popular for parties and quick dinners, I gathered up the questions I hear most often. No question is too small when you’re trying to nail that perfect Game Day snack!
Can I use different rolls?
You sure can try, but you might miss out on the signature taste! The sweet Hawaiian rolls are really the backbone of this dish, giving you that great flavor contrast with the salty pepperoni. If you can’t find them, brioche rolls are your next best bet. They are also slightly sweet and soft. Just a heads up: if you use a plain, non-egg-based roll, you might want to brush a tiny bit of melted sugar or honey onto the tops along with the butter to mimic some of that sweetness!
What is the best way to reheat leftover Hawaiian roll pizza sliders?
If you managed to have any leftovers—which, honestly, takes some serious willpower—the microwave is your enemy here! It turns the bread soggy andゴム-like, and that’s just tragic for leftovers. The best way to revive these appetizer recipes for a crowd is either in the oven or an air fryer. Pop them on a baking sheet in the oven at about 325 degrees for 8 to 10 minutes until the cheese is soft and gooey again. The air fryer is even faster—just about 4 minutes at 350 degrees. That keeps the tops from getting too dry while warming the center perfectly.
If you’re always looking ahead, check out my guide on freezing and reheating freezer breakfast burritos for more make-ahead meal tips!
Can I make these pizza sliders vegetarian?
Of course! These are easily adaptable for vegetarians. The core structure, the rolls and the cheese, are delicious on their own. To make these vegetarian, just skip the pepperoni entirely. Then, pile on the mozzarella and add things like thinly sliced black olives, sautéed mushrooms, or even some thinly sliced bell peppers. Just make sure your pizza sauce doesn’t contain any meat product, though most standard ones don’t! They make fantastic kid friendly pizza bites this way.
Estimated Nutritional Data for Pizza Sliders
Alright, let’s talk brass tacks! When you’re making something this delicious, you know there’s going to be some decadence involved, but I like to have a general idea of what we’re working with. As you know, this is a real-life kitchen recipe, not something made in a sterile lab, so these numbers are based purely on the specific ingredients listed in the recipe above—especially that buttery topping on those sweet Hawaiian rolls!
If you’re keeping track of things, here are the estimated facts per one slider serving (so, about one-twelfth of the whole batch):
- Calories: Around 320 calories
- Fat: Roughly 16 grams (watch out for that saturated fat, but hey, that’s the butter talking!)
- Carbohydrates: About 30 grams
- Protein: A surprising 15 grams, thanks to all that cheese and pepperoni.
Just remember, this is a serving suggestion for one! When you are making these for game day or a big family crowd, people usually grab two or three because they are just too easy to resist. I always say, enjoy them in the moment, and worry about the exact macros later. If you are looking to lighten these up, you can always skip the garlic butter step initially and just rely on the internal moisture—but honestly, why skip the best part?
Share Your Homemade Pizza Bites Experience
Okay, now that you have the secrets to the ultimate quick weeknight dinner or Game Day smash hit, I absolutely want to hear about it! Seeing your creations is seriously the best part of sharing these recipes with you all.
When you make these irresistible homemade pizza bites, please, please leave a star rating right down below the recipe card. That little rating helps other folks know how much you loved them, and honestly, it helps me know which recipes I should be posting more often!
If you snapped a picture of the incredible cheese pull or your fully loaded baking dish, tag me on social media! I love seeing how you customize them for your own gatherings. It’s all about community in the kitchen, and knowing these garlic butter sliders made your party a success means the world to me.
And hey, if you ever want to know more about how we test recipes here or just want to chat about baking fails and triumphs, you can always peek at our About Us page! Happy cooking, you all!
PrintEasy Pull-Apart Pizza Sliders with Garlic Butter
Make these quick and cheesy pull-apart pizza sliders using Hawaiian rolls. They are perfect for game day, parties, or a simple weeknight meal.
- Prep Time: 15 min
- Cook Time: 25 min
- Total Time: 40 min
- Yield: 12 sliders
- Category: Appetizer
- Method: Baking
- Cuisine: American
- Diet: Vegetarian
Ingredients
- 1 (12 count) package sweet Hawaiian rolls
- 1 cup pizza sauce
- 1 pound thinly sliced pepperoni
- 3 cups shredded mozzarella cheese
- 1/2 cup unsalted butter, melted
- 2 cloves garlic, minced
- 1 teaspoon dried Italian seasoning
- 1/4 cup grated Parmesan cheese
Instructions
- Preheat your oven to 350 degrees Fahrenheit. Lightly grease a 9×13 inch baking dish.
- Slice the entire package of Hawaiian rolls in half horizontally, keeping the rolls connected. Place the bottom half of the rolls into the prepared baking dish.
- Spread the pizza sauce evenly over the bottom layer of rolls.
- Layer the pepperoni slices over the sauce.
- Sprinkle the mozzarella cheese evenly over the pepperoni layer.
- Place the top half of the rolls onto the cheese layer.
- In a small bowl, combine the melted butter, minced garlic, and Italian seasoning. Mix well.
- Brush the garlic butter mixture evenly over the top of the assembled sliders. Sprinkle with Parmesan cheese.
- Cover the baking dish tightly with aluminum foil. Bake for 15 minutes.
- Remove the foil and bake for another 5 to 10 minutes, or until the cheese is fully melted and bubbly and the tops are lightly golden brown.
- Let the sliders rest for 5 minutes before slicing between the rolls and serving.
Notes
- To prevent soggy bottoms, you can lightly toast the bottom halves of the rolls in the oven for 3 minutes before adding the sauce and fillings.
- You can assemble these sliders up to 4 hours ahead of time. Cover them tightly and refrigerate. Add 5 to 10 minutes to the covered baking time if baking directly from the refrigerator.
- Use your favorite pizza toppings, such as cooked sausage or sliced mushrooms, in addition to or instead of pepperoni.
Nutrition
- Serving Size: 1 slider
- Calories: 320
- Sugar: 10
- Sodium: 650
- Fat: 16
- Saturated Fat: 8
- Unsaturated Fat: 8
- Trans Fat: 0.5
- Carbohydrates: 30
- Fiber: 1
- Protein: 15
- Cholesterol: 40