

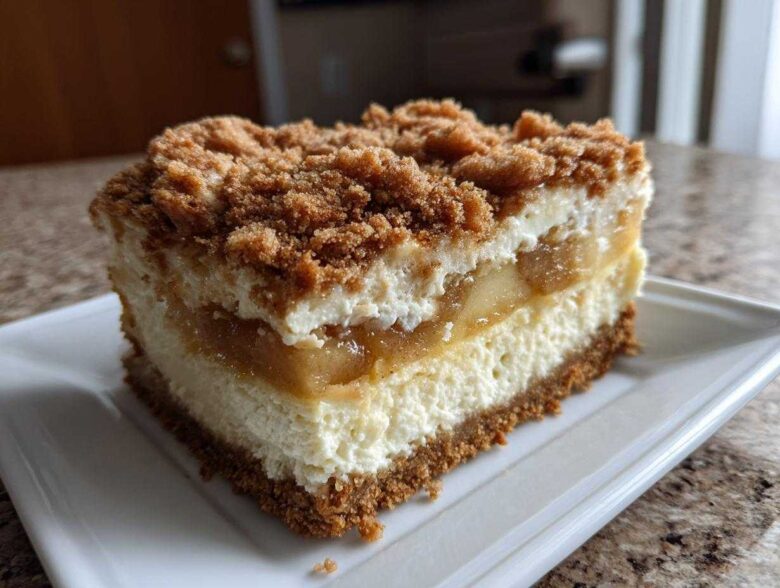
Let’s talk about holiday dessert perfection. When the cool air hits and it’s time for Thanksgiving or Christmas gatherings, one dessert always steals the show: my apple pie cheesecake. Seriously, why pick between a slice of creamy cheesecake and a warm piece of spiced apple pie when you can have both? This recipe is the absolute dream mashup. I’ve been perfecting this combination for years—tweaking the spice mix and getting that water bath just right—so everyone raves about how smooth it is, yet still packed with that classic apple flavor. If you want to know more about our baking philosophy, check out our site here! Trust me, this impressive holiday cheesecake will become your go-to!
Why This is the Best Apple Pie Cheesecake Recipe (Ultimate Dessert Mashup)
Listen, I know there are tons of recipes out there, but this one truly earns the title of the Best Apple Pie Cheesecake. It’s more than just throwing apples on top of a regular cheesecake; it’s about creating that ultimate dessert mashup experience! The magic is in the layers, honestly. You get that perfectly smooth, tangy cream cheese base, then the warm burst of those cinnamon-spiced apples, all hugged by a buttery, crunchy streusel topping. When I first brought this to my family’s Thanksgiving potluck, people went wild. They kept asking if it was store-bought because it looked so fancy.
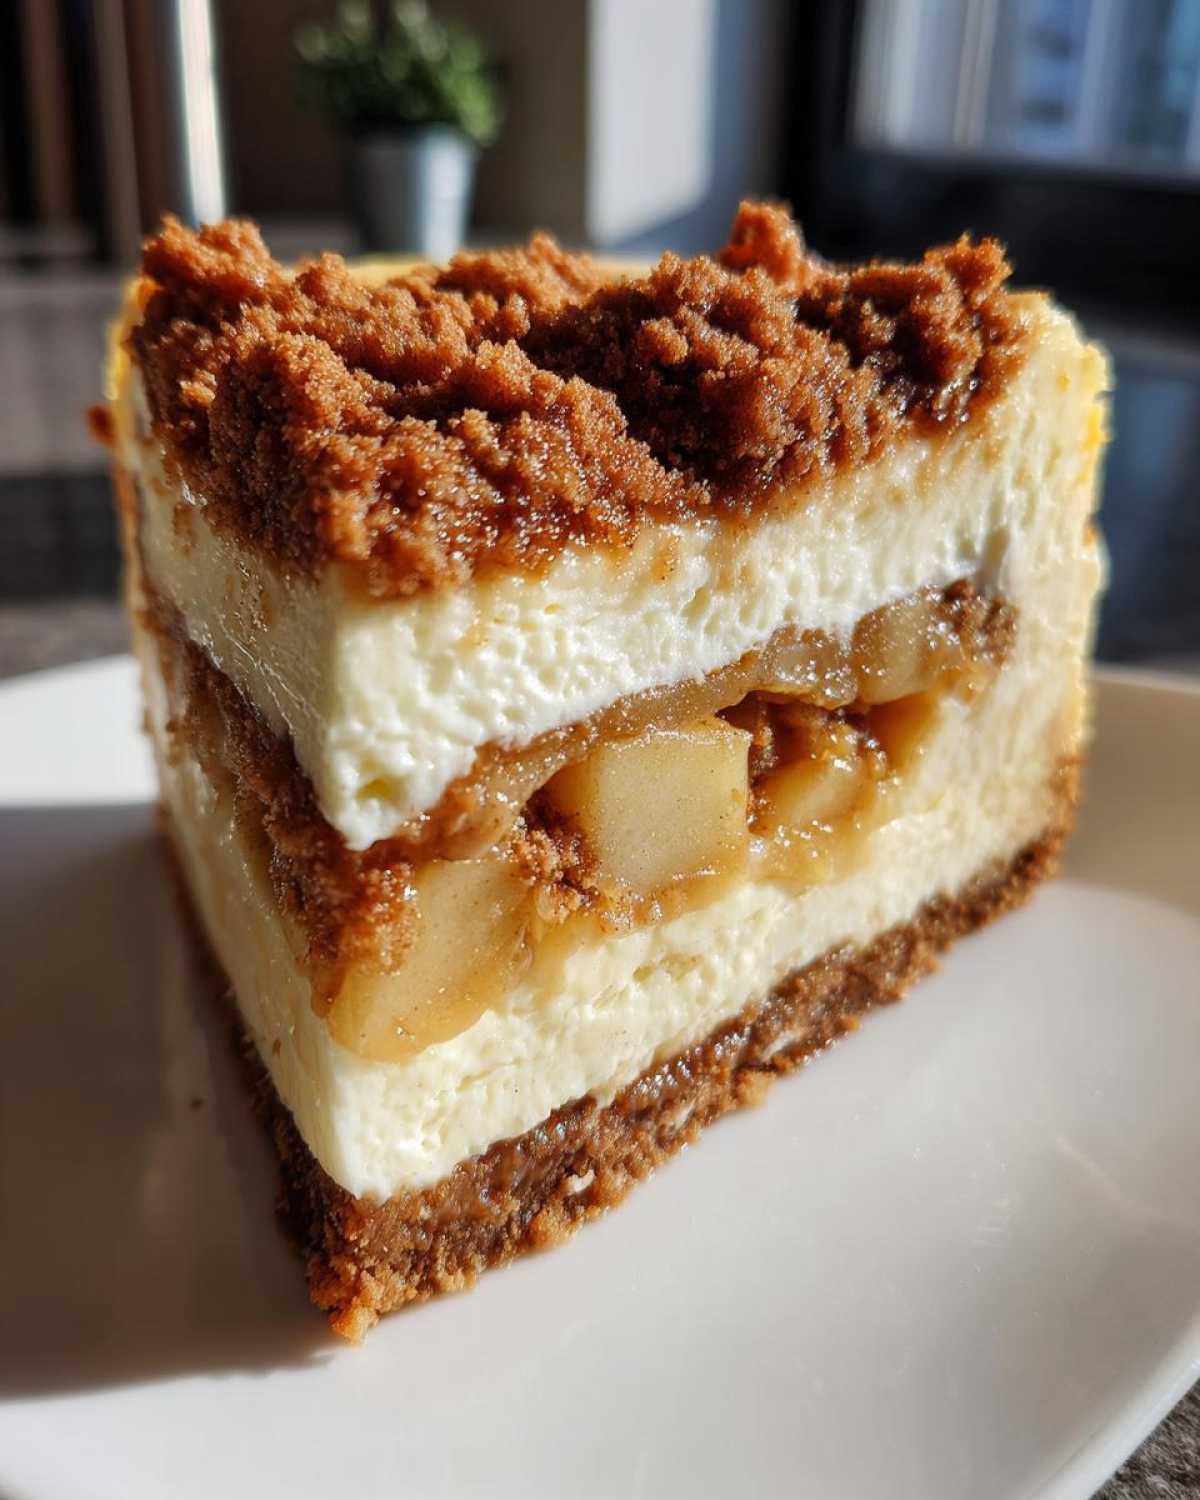
This recipe just nails the balance. It’s rich, but the apples cut through that richness perfectly, keeping things light enough for a big holiday meal. It definitely stands out among other Fall Cheesecake Recipes.
Key Features of Our Creamy Apple Cheesecake
- The use of a proper water bath guarantees that famously silky, crack-free texture every single time—seriously, don’t skip it!
- We use just the right amount of nutmeg and cinnamon in both the apples *and* the batter for a deep, dimensional flavor profile.
- The homemade streusel gives you that satisfying, crisp crunch, mimicking the best part of an apple crisp topping right on top of your cheesecake.
If you’re looking for amazing Holiday Cheesecake Ideas that require a little effort but deliver massive payoff, this is it. Dig into this; you won’t regret it!
Ingredients Needed for Classic Apple Pie Cheesecake
Okay, let’s get down to brass tacks. Gather your supplies! The key to getting that unbelievably creamy texture we talked about—the kind you just want to sink into—is making sure your main dairy components are ready to go. For the cheesecake filling specifically, everything needs to be at room temperature. I mean it! If your cream cheese or eggs are cold, you’ll get lumps, and honestly, nobody has time for lumpy cheesecake, especially when company is coming.
Here’s the list you’ll need to grab. I’ve broken it down loosely by section so you can see what goes where. If you need some inspiration for other spiced apple treats while you shop, check out my favorite apple cinnamon muffins!
For the Crust, you’ll need:
- 1 1/2 cups graham cracker crumbs
- 1/4 cup granulated sugar (for crust)
- 6 tablespoons unsalted butter, melted
For the Creamy Cheesecake Filling (Remember: Cream Cheese and Eggs MUST be room temperature!):
- 3 (8 ounce) packages cream cheese, softened
- 1 1/2 cups granulated sugar (for filling)
- 1 teaspoon vanilla extract
- 1/2 teaspoon ground cinnamon
- 4 large eggs (room temperature!)
For the Spiced Apple Filling and Topping:
- 2 cups diced apples (I always reach for Granny Smith or Honeycrisp for the best balance!)
- 1/4 cup brown sugar (for apples)
- 1 teaspoon lemon juice
- 1/4 teaspoon ground nutmeg
- For the Streusel Topping:
- 1/2 cup all-purpose flour
- 1/4 cup packed brown sugar (for streusel)
- 1/4 cup cold unsalted butter, cubed (it has to be cold for the crumble!)
- 1/2 teaspoon ground cinnamon (for streusel)
That’s everything! Once you have these gorgeous ingredients lined up, the assembly part is actually super straightforward. Just make sure you respect the room temperature rule for the cream cheese, and this Apple Pie Cheesecake Recipe will turn out flawlessly!
Step-by-Step Instructions for Your Apple Pie Cheesecake
Now for the fun, hands-on part! Making this Cheesecake with Apple Filling is a process, but you absolutely manage it beautifully if you take it one step at a time. Don’t let the water bath scare you; it’s our secret weapon for a perfectly smooth, Easy Homemade Cheesecake that never cracks. Remember, you’re building layers here, so patience is key between stages!
Creating the Graham Cracker Crust Cheesecake Base
First things first, get that oven humming along at 350°F (175°C). Before you do anything else, wrap your 9-inch springform pan tightly, like you’re swaddling a baby, using heavy-duty foil. This keeps that crucial hot water bath from seeping in. For the crust: mix those graham cracker crumbs, the small bit of sugar, and the melted butter. Then, press it down *firmly* into the bottom of that foil-wrapped pan. I use the flat bottom of a measuring cup for this; you want a solid foundation! Pop that crust in for 10 minutes just to set it, and then let it cool off while you get the other bits ready.
Preparing the Spiced Apple Filling and Cinnamon Streusel Topping
While the crust chills out, let’s cook the filling base. Toss your diced apples with that brown sugar, lemon juice, nutmeg, and half a teaspoon of cinnamon in a little saucepan. You only need about 5 to 7 minutes on medium heat—just until they start to soften up a bit. We don’t want applesauce! Strain any extra liquid away. For the streusel, take your flour, brown sugar, and the rest of that cold butter cubes. Use your fingers to rub that butter into the dry stuff until it looks like chunky little pea-sized crumbs. That cold butter ensures the topping stays crisp after baking!
Now for the assembly! Pour half your smooth cheesecake batter over the crust. Gently spoon all those gorgeous spiced apples right over that layer. Finish by pouring the *rest* of the batter over the apples, aiming for an even layer. Finally, sprinkle that buttery streusel all over the top layer. It looks amazing already, I promise!
Baking and Cooling the Apple Pie Cheesecake Properly
This is where we ensure we get that ideal texture. Put your foil-wrapped springform pan inside a larger roasting pan. Carefully pour hot water into the roasting pan until it comes about halfway up the sides of the springform—that’s your water bath, keeping things gentle and steamy for the cheesecake. Bake it until the edges look set, but the very center still jiggles slightly. After the time is up, turn the oven OFF. Crack the door open just an inch or so and let it hang out in that slow-cooling environment for a full hour. This slow transition is vital to stop those dreaded cracks! If you want more tips on amazing easy homemade cheesecake techniques, check out this guide!
Tips for the Most Impressive Holiday Cheesecake
You’ve done the hard part—mixing and assembling this gorgeous dessert! Now, let’s talk about making absolutely sure it comes out looking like it belongs on a magazine cover. Even with a great recipe like this amazing apple pie cheesecake, a couple of small slips can lead to trouble, like a cracked top or a mushy crust. I rely on these methods every time I bake for company, especially since this is supposed to be one of your show-stopping Baking Recipes for Fall.
When it comes to the apples, please don’t just grab any old bag from the grocery store! For texture and flavor, you want apples that hold up well under heat. I always swear by a mix of Granny Smith—just for that necessary tartness to balance the sugar—and Honeycrisp, which stays firm and sweet. That perfect pairing is why this is so much better than a standard dessert. If you want more ideas for autumnal baking, come look at my favorites for baking recipes for fall!
Avoiding Cracks in Your Apple Pie Cheesecake
Seriously, dealing with cheesecake cracks is like wrestling an octopus—frustrating and messy! But mastering this simply comes down to temperature and steam management. If you skip the water bath, you’re basically asking for trouble because the heat hits the filling too directly and unevenly.
Here are my foolproof rules:
- Room Temp is King: I keep saying it, but I can’t stress it enough—your cream cheese, eggs, everything needs to be completely softened and at room temperature. Cold ingredients force you to overmix the batter just trying to smooth out lumps, and overmixing whips in too much air, which then expands and collapses when cooling, leading to a crack!
- The Water Bath Shield: Make sure that foil wrap around your springform pan is tight! You want a gentle, humid bake. That steam keeps the surface of the batter soft while the sides set. It’s the best insurance policy for a beautiful, unblemished top layer.
- Slow Down for the Finish: Never pull a hot cheesecake straight from the oven to the counter. The sudden temperature change shocks the structure. That mandatory hour sitting inside the cooling oven—door propped open—is non-negotiable if you want that dreamy, flat surface for your streusel!
Follow these three points, and you’ll have a perfectly smooth cheesecake every single time, ready for its close-up!
Variations: Apple Crisp Cheesecake and Salted Caramel Apple Dessert Ideas
So, you’ve mastered the classic, creamy version, but now you’re thinking, “How can I make this seasonal masterpiece even *more* over-the-top?” That makes total sense! This base recipe is so solid that it begs for fun twists. If you want to lean hard into that cozy autumn vibe, we can turn this into an amazing Apple Crisp Cheesecake Recipe instead of just using a dusting of streusel on top.
The easiest way to transform this is by adjusting the topping ratio. Instead of just sprinkling the streusel over the top batter layer, double the streusel ingredients listed in the recipe (flour, brown sugar, cold butter, cinnamon). After you layer the apples over the first half of the batter, spoon that doubled streusel mixture heavily over the apples, and then top with the remaining cheesecake batter. It bakes up a little differently as the streusel gets layered inside and on top, almost like a true cobbler structure—that’s your Apple Crisp Cheesecake!
If you’re feeling decadent—and let’s be honest, holiday desserts are for being decadent—you absolutely have to look into adding caramel. I whipped up a fantastic caramel apple crisp recipe last week, and those same flavor notes work wonders here! Forget just serving it plain; try drizzling a rich, homemade salted caramel sauce right over the top after the cheesecake has chilled completely. It turns this into a show-stopping Salted Caramel Apple Dessert that will have people asking for the recipe immediately. The salt cuts the sweetness of the caramel and heightens the spice from the cinnamon in the topping beautifully. It’s an easy last-minute addition that truly elevates any Spiced Apple Dessert Inspiration you’re working with!
Storage and Reheating Instructions for Your Apple Pie Cheesecake
Wow, you actually made it through the baking and cooling process! That’s half the battle won. Now comes the hardest part, right? Waiting! Because this is a glorious, loaded apple pie cheesecake, patience is absolutely required before you can slice into it. You need that overnight chill time to let everything truly set up. If you try this warm, you’ll end up with a lovely apple soup, not the sturdy slice you deserve!
I recommend covering that beautiful creation tightly once it’s completely cool—that usually means waiting until it’s been out of the oven for a few hours. Use plastic wrap, but try not to let it touch the streusel topping, or it’ll stick and mess up your beautiful sprinkles. Once wrapped up, slide it into the fridge. You *must* let it chill for at least six hours, but honestly, if you can hold out until the next day, it’s always better.
How Long Does This Fall Cheesecake Recipe Last?
Stored properly in the refrigerator, this Fall Cheesecake Recipe stays fantastic for about four to five days. Because of the cooked apples and the richness of the cream cheese, it holds up really well! If you find yourself with too much leftover beauty (which never happens in my house!), freezing is an option. Just make sure it’s fully chilled first, then wrap it really well—plastic wrap first, then maybe a layer of foil—to protect it from freezer burn. I usually cut it into slices before wrapping them individually; that way, you can just pull out what you need!
Thawing Frozen Cheesecake Slices
Thawing? Slow and cold is the way to go. Never try to rush cheesecake! Move the pre-sliced, tightly wrapped cheesecake from the freezer straight into the refrigerator. It takes a full day, maybe even a little longer depending on the size of the slice, to fully thaw safely. Once it’s thawed in the fridge, let it sit on the counter for about 20 minutes before serving if you want that perfect, smooth, cool-but-not-icy mouthfeel. If you are still craving apple flavors, you can always pair a slice with some warm apple cinnamon crepes!
The chilling process firms up that graham cracker crust perfectly, too, making sure your slices are clean and gorgeous. Seriously, that overnight chill is the invisible finishing touch!
Frequently Asked Questions About Apple Pie Cheesecake
I get so many messages after the holidays asking clarifying questions about this recipe, which just means you guys are really excited to bake it, and I love that! I gathered up the absolute most common queries I hear about making the apple pie cheesecake perfect.
Can I make this apple pie cheesecake recipe without a water bath?
Okay, this is the million-dollar question! Yes, you *can* technically skip the water bath, but I have to warn you—you’re playing with fire! A water bath provides gentle, steamy heat that keeps the exposed edges of the cheesecake from baking faster and drying out, which is what causes cracking. If you skip it, you need to drop your oven temperature down to about 325°F (160°C) and watch it like a hawk. You also won’t get that ultra-silky texture; it tends to set up a bit firmer. If you really can’t do the water bath, just know you risk a crack, but we know how to cover those up later, right?
What is the best way to serve this Cinnamon Apple Topping Dessert?
This is truly a matter of personal preference, but I have a couple of favorite ways. Since this is a baked cheesecake, I find it tastes the absolute best when served chilled, straight from the fridge. That firmness makes the Graham Cracker Crust Cheesecake base super sturdy when slicing. However, if you want to really lean into that warm apple pie feeling, you can let a slice sit out on the counter for about 20 minutes to take the deep chill off. Or, heat a slice gently in the microwave for just 10 seconds—don’t scorch the cream cheese! Either way, it pairs unbelievably well with a scoop of high-quality vanilla bean ice cream or just a big dollop of homemade whipped cream on the side.
Also, if you’re looking to skip baking altogether next time, I have a fantastic guide on no-bake pumpkin oat energy bites that might give you some ideas for a No Bake Apple Pie Cheesecake adaptation if you wanted to try that next season!
What kind of apples should I use for the filling?
For that perfect texture and flavor blend in the apple layer, you need apples that hold their shape and have a nice tartness to contrast the sugar in the cheesecake. I always recommend using Granny Smith apples because they are beautifully tart, or Honeycrisp, which stays wonderfully firm. If you only have one type, that’s fine, but a mixture gives you the best complexity!
I served it warm and it fell apart a bit. What went wrong?
Oh, that’s the chilling talking! Cheesecake needs time for the fats and proteins to firm up again after baking. If you cut into it too soon, even after the slow cool down, the internal structure hasn’t completely stabilized. For the neatest slice and the best texture, you really need to let it chill, covered, in the refrigerator for a minimum of six hours, but overnight is always my strongest recommendation. It makes all the difference in how cleanly it sets!
Estimated Nutritional Information for This Fall Cheesecake Recipe
I know some of you are super meticulous about tracking everything, or maybe you’re just curious where all that deliciousness comes from! When I pull together one of these decadent treats, like our apple pie cheesecake, I always manage to use a general nutritional calculator for an estimate. It helps me feel slightly less guilty about eating that second slice, right?
Keep in mind that these numbers are just guidance, based on standard measurements and preparation methods for this recipe. If you substitute ingredients—say, you use a lighter cream cheese or add a heavy drizzle of apple pie smoothie ingredients on top instead of the streusel—the final count is going to shift!
Based on the full recipe for 12 servings, here’s what the estimates look like:
- Serving Size: 1 slice
- Calories: 450
- Sugar: 45g (Yep, it’s a treat year, after all!)
- Sodium: 250mg
- Fat: 28g
- Saturated Fat: 17g
- Carbohydrates: 48g
- Protein: 6g
- Cholesterol: 110mg
This information generally lumps this right into the “Rich Holiday Dessert” category, which is exactly where this Fall Cheesecake Recipe belongs! Enjoy every single bite, because you earned it after dealing with that water bath!
Share Your Ultimate Dessert Mashup Experience
I’ve poured out all my secrets, my best tips for handling the water bath, and my absolute favorite ways to eat this incredible apple pie cheesecake. But honestly, baking is just better when you share the results!
I really, truly want to know what you think once you give this a try. Did the streusel topping turn out perfectly rustic? Did your family even make it to see tomorrow before the whole thing disappeared? Don’t leave me hanging!
Please leave a star rating right down below—it helps other bakers know they can trust this recipe, especially when tackling a big bake like this amazing Ultimate Dessert Mashup. And if you took a picture of your finished slice looking all pretty and glazed, I would absolutely love to see it! Tag me when you post it on social media so I can admire your handiwork.
If you’re looking for even more indulgent recipes after conquering this masterpiece, you can always browse the full archives on the blog! Happy baking, friends—can’t wait to hear all about your cheesecake success!
PrintClassic Baked Apple Pie Cheesecake with Cinnamon Streusel
A rich, creamy cheesecake base layered with spiced apple filling and topped with a buttery cinnamon streusel topping.
- Prep Time: 30 min
- Cook Time: 75 min
- Total Time: 105 min
- Yield: 12 servings
- Category: Dessert
- Method: Baking
- Cuisine: American
- Diet: Vegetarian
Ingredients
- 1 1/2 cups graham cracker crumbs
- 1/4 cup granulated sugar (for crust)
- 6 tablespoons unsalted butter, melted
- 3 (8 ounce) packages cream cheese, softened
- 1 1/2 cups granulated sugar (for filling)
- 1 teaspoon vanilla extract
- 1/2 teaspoon ground cinnamon
- 4 large eggs
- 2 cups diced apples (such as Granny Smith or Honeycrisp)
- 1/4 cup brown sugar (for apples)
- 1 teaspoon lemon juice
- 1/4 teaspoon ground nutmeg
- 1/2 cup all-purpose flour (for streusel)
- 1/4 cup packed brown sugar (for streusel)
- 1/4 cup cold unsalted butter, cubed (for streusel)
- 1/2 teaspoon ground cinnamon (for streusel)
Instructions
- Preheat your oven to 350°F (175°C). Wrap the outside of a 9-inch springform pan tightly with heavy-duty aluminum foil.
- Prepare the crust: Mix graham cracker crumbs, 1/4 cup sugar, and 6 tablespoons melted butter. Press the mixture firmly into the bottom of the prepared springform pan. Bake for 10 minutes. Set aside to cool slightly.
- Prepare the apple layer: In a small saucepan, combine diced apples, 1/4 cup brown sugar, lemon juice, nutmeg, and 1/2 teaspoon cinnamon. Cook over medium heat for 5 to 7 minutes until apples soften slightly. Drain any excess liquid.
- Prepare the cheesecake batter: Beat the softened cream cheese with 1 1/2 cups sugar, vanilla extract, and 1/2 teaspoon cinnamon until smooth. Beat in the eggs one at a time, mixing just until combined after each addition. Do not overmix.
- Assemble the cheesecake: Pour half of the cheesecake batter over the cooled crust. Spoon the cooked apple mixture evenly over the batter. Pour the remaining cheesecake batter over the apples.
- Prepare the streusel topping: In a small bowl, combine flour, 1/4 cup brown sugar, and 1/2 teaspoon cinnamon. Cut in the cold butter cubes using your fingers or a pastry blender until the mixture resembles coarse crumbs. Sprinkle the streusel evenly over the top layer of batter.
- Bake: Place the foil-wrapped springform pan in a larger roasting pan. Carefully pour hot water into the roasting pan to reach halfway up the sides of the springform pan (this creates a water bath). Bake for 60 to 75 minutes, or until the edges are set and the center has a slight jiggle.
- Cool: Turn off the oven, crack the door open, and let the cheesecake cool inside the oven for 1 hour. Remove from the water bath, remove the foil, and let it cool completely on a wire rack.
- Chill: Refrigerate the cheesecake for at least 6 hours, or preferably overnight, before serving. Run a thin knife around the edge before releasing the springform side.
Notes
- For an easier crust, press the crumbs firmly into the pan using the bottom of a measuring cup.
- If you skip the water bath, watch the cheesecake closely to prevent cracking.
- For a Salted Caramel variation, drizzle cooled cheesecake with salted caramel sauce before serving.
Nutrition
- Serving Size: 1 slice
- Calories: 450
- Sugar: 45g
- Sodium: 250mg
- Fat: 28g
- Saturated Fat: 17g
- Unsaturated Fat: 11g
- Trans Fat: 0.5g
- Carbohydrates: 48g
- Fiber: 1g
- Protein: 6g
- Cholesterol: 110mg